Splints are generally applied to decrease movement to provide support and comfort through stabilization of an injury. In the emergency department (ED), splints are primarily used to stabilize nonemergency injuries to bones until the patient can be evaluated by a consultant such as an orthopedic surgeon, at which time definitive casting can be performed.[1, 2] Splints can also serve as initial immobilization in the preoperative period or can immobilize an injury for primary healing. All patients with injuries that are splinted should be referred for evaluation by a consultant in a timely fashion (within 2-3 days).[3, 4]
A posterior elbow splint is primarily used to stabilize the following injuries:
Although no true contraindications exist to the placement of a splint, certain injuries require immediate evaluation or intervention by a consultant (eg, orthopedic surgeon, hand surgeon, plastic surgeon) and, as such, may not necessitate splinting. Such injuries include the following:
Materials employed in posterior elbow splinting include the following:
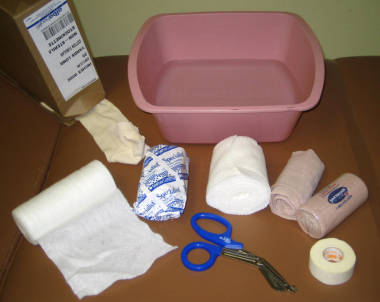 Equipment for splint. Image courtesy of Kenneth R. Chuang, MD.
Anesthesia
Splinting is usually tolerated without the use of anesthesia. However, if significant manipulation or reduction of the injury is required during the splinting process, anesthetic techniques may be used. Acceptable techniques include the following:
With the administration of any analgesic agent or the initiation of a formal sedation protocol, care should be taken to avoid oversedation. A complete neurovascular examination should be performed before and after the splint has been applied.
Positioning
Place the patient in a comfortable position (eg, seated or reclined). The elbow should be flexed to 90º, the wrist slightly extended at 10-20º, and the forearm in the neutral position with the thumb up.
Cover the patient with a sheet to avoid splatter from the wet plaster (see the image below).
Cover patient appropriately. Video courtesy of Kenneth R. Chuang, MD.Completely expose the injured limb. Remove any tight-fitting clothing on the affected extremity that would otherwise have to be removed with scissors after the splint is placed. Jewelry should be removed. In particular, rings can cause constriction and ischemia of the fingers with delayed swelling of the soft tissues. If unable to remove a ring, try using soap as a lubricant or consider a ring cutter. (See the image below.)
Remove jewelry and rings to avoid ischemia from swelling. Video courtesy of Kenneth R. Chuang, MD.Explain the procedure to the patient, including risks and benefits. Obtain informed consent.
With the patient appropriately positioned (see Periprocedural Care, Patient Preparation), apply the stockinette. The stockinette should extend from the proximal humerus to beyond the fingertips. Cut an adequate hole for the thumb, being careful to avoid constriction of the thumb. When measuring the stockinette, cut longer than the splint. The stockinette should extend 2-3 cm beyond the overlying padding on either end. In turn, the padding should extend 2-3 cm beyond the overlying wet plaster on either end. Together, the stockinette and padding should be pulled over the edges of the wet plaster to create smooth edges. (See the video below.)
Stockinette application for posterior elbow splint. Video courtesy of Kenneth R. Chuang, MD.Wrap the padding (eg, Webril) over the stockinette. Begin proximally and wrap distally, overlapping each layer by half the width. Also, allow for extra length; the padding should extend 2-3 cm beyond the overlying plaster on both ends. Smooth out creases and avoid wrinkles, unwrapping and rewrapping as necessary. Apply extra padding to the bony prominences and epicondyles of the elbow, to the bony prominences of the wrist, to the metacarpophalangeal joints, and to the base of the thumb. (See the video below.)
Cotton padding application for posterior elbow splint. Video courtesy of Kenneth R. Chuang, MD.Measure the plaster. For the average-sized adult, plaster for the posterior elbow splint should be 8-10 layers thick. Use plaster that is 7.5-10 cm wide. With a roll of dry plaster, measure the first layer of plaster from the ulnar side of the hand at the level of the palmar crease, extending proximally along the ulnar side of the forearm to the proximal humerus. Allow for roughly 5 mm of extra length on either end; plaster shrinks when wet. Then, with the desired length pinched off, fold over the plaster. Begin unrolling the plaster and folding until the splint is 8-10 layers thick.
Measuring dry plaster for posterior elbow splint. Video courtesy of Kenneth R. Chuang, MD.If prefabricated fiberglass is being used, the stockinette and padding steps can usually be skipped. In such cases, follow the manufacturer recommendations.
Submerge the plaster in clean, room-temperature water. Allow all the bubbles to escape. This starts the lamination process of the plaster and allows the layers to bond together. Squeeze out the excess water. With the fingers, pull out remaining water. Then, lay the plaster on a flat surface or dry towel and smooth out wrinkles and folds. This allows further bonding of the plaster layers. (See the video below.)
Wetting the plaster for posterior elbow splint. Video courtesy of Kenneth R. Chuang, MD.With the affected arm positioned as described above, apply the wet plaster over the padding, from the ulnar side of the hand at the level of the mid-metacarpals, covering proximally along the ulnar half of the forearm to the proximal humerus. At this point, someone other than the person applying the splint must hold the distal end of the wet plaster as the plaster is applied proximally. The patient may be able to do this with his or her other hand; if not, an assistant must be used.
Fold out the excess plaster created at the elbow due to flexion and mold it against the outside splint material. The underlying stockinette and padding should then be folded outward on both ends, creating smooth edges. The splint should be reinforced with two struts (one medial, one lateral) from mid-humerus to mid-forearm. The struts are constructed from double-folded strips of 2.5-cm plaster molded into the existing splint material. The splint should start distal to the wrist to prevent a wrist flexor contracture or wrist drop. (See the video below.)
Applying wet plaster for posterior elbow splint. Video courtesy of Kenneth R. Chuang, MD.Apply the bandage wrap over the wet plaster. Start distally and wrap proximally. Avoid wrapping too tightly. Cut an adequate hole for the thumb. (See the video below.)
Applying bandage wrap for posterior elbow splint. Video courtesy of Kenneth R. Chuang, MDWhile the plaster is still wet, mold the splint into the desired shape. The elbow should be in 90º of flexion. The wrist and hand should be in a neutral position. Extend the wrist to 20º, and abduct the thumb. The hand, wrist, forearm, and elbow should remain immobile until the splint is dry. Advise the patient that he or she may feel some warmth released from the plaster as it dries. However, if the heat becomes too intense, unwrap the splint and remove the plaster immediately. Thermal burns can occur.[9] (See the video below.)
Molding the posterior elbow splint. Video courtesy of Kenneth R. Chuang, MD.Check neurovascular function after the splint has dried. Recall that the median nerve provides sensory function to the palmar side of the thumb; to the palmar side of the second, third, and lateral half of the fourth digits; and, dorsally, to the distal half of the second and third digits and the lateral half of the fourth digit. The ulnar nerve provides sensory function to the palmar and dorsal aspects of the fifth digit and the medial half of the fourth digit. The radial nerve provides sensory function to the dorsal surface of the hand and to the web space between the first and second digits.
Assess motor function, as well. Peripheral vascular assessment can be accomplished by checking capillary refill. Wipe away any plaster that may have dropped onto the patient's skin. (See the video below.)
Test neurovascular function and capillary refill. Video courtesy of Kenneth R. Chuang, MD.Place the patient's affected arm in a sling. Instruct the patient to use the sling to increase stability and decrease pain with movement. However, when the patient is at rest, the sling should be removed and the arm elevated.
Deliver appropriate aftercare instructions. Instruct the patient to rest, elevate, and ice the injured limb. Instruct the patient to remove the splint and return immediately or go to an emergency department (ED) if he or she experiences weakness or numbness, color change (pale or bluish), increasing pressure or pain, or spreading redness or streaking. The splint must be kept clean and dry.
Patients can be tempted to use sticks, pens, or hangers to scratch an itch. Advise the patient that sticking objects into the splint can wrinkle the padding and lead to pressure sores or cause a break in the skin and lead to an unattended infection.
The splint should be rechecked in 48 hours. Also, arrange for follow-up with a consultant, usually in 2-3 days. If the patient received any sedation or opioids, advise against driving or alcohol consumption. (See the image below.)
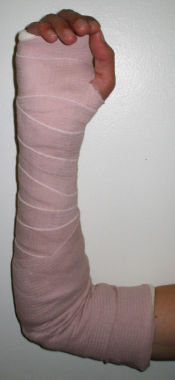 Posterior elbow splint. Image courtesy of Kenneth R. Chuang, MD.
To assist in achieving neutral position of the hand and wrist, some practitioners advocate having the patient hold a can or a bandage wrap. Alternatively, the patient can imagine holding a wine glass. With either method, maintain the wrist at 20º extension.
For injuries or reductions that require shorter drying times, faster-setting plaster is available (eg, Specialist Extra Fast Setting Plaster, which sets in 2-4 minutes). However, as the plaster dries faster, the risk of thermal injury increases. For most splints, regular plaster (eg, Specialist Fast Setting Plaster, which sets in 5-8 minutes) is appropriate.
Consider prescribing diphenhydramine or another antihistamine for itching. However, if the itching persists or worsens, evaluate the splint for complications.
Thermal burns are a possible complication. Patients can expect some warmth as the plaster dries. However, if they report intense heat or any pain, remove the plaster immediately.[10] As more layers of plaster are used, more heat is produced. Use clean, room-temperature water. Water that is dirty or too warm accelerates the drying time and increases the heat produced. Do not wrap towels or blankets around the splint to shorten drying time. This produces excess heat.
Pressure ulcers may develop. Provide extra padding to bony prominences. When wrapping the cotton padding, avoid creases. When creases occur, smooth them out or unwrap and rewrap as needed. When molding the wet plaster, use broad-based pressure. In other words, do not use the fingertips; rather, use the entire palmar surface of the hands and fingers.
Contact dermatitis is another possible complication.
Ischemia and neurovascular compromise may result from increased pressure from swelling.[11] If moderate-to-significant swelling is anticipated, cut the cotton padding lengthwise along the lateral or radial side of the forearm before applying the wet plaster to the medial side. This allows for expansion of the padding. Also, if using tape to secure the outermost bandage wrap, do not tape circumferentially.
Advise the patient that, depending on the extent and nature of the initial injury, he or she can often expect long-term pain, arthritis, stiffness, and decreased range of motion from immobilization, despite best care practices. The aftercare of such injuries often requires physical therapy.[12]
Copyright © www.orthopaedics.win Bone Health All Rights Reserved