In general, splints are applied to decrease movement and provide support and comfort through stabilization of an injury.[1] They are primarily used to secure nonemergency injuries to bones until they can be evaluated by a consultant such as an orthopedic surgeon. They are also used to temporarily immobilize an extremity before surgery (eg, for an open fracture) or to assist in primary healing.
Unlike casts, splints are noncircumferential and are often preferred in the emergency department setting, in that injuries are often acute and continued swelling can occur. All patients with injuries that are splinted should be referred for evaluation by a consultant in a timely fashion (usually within 2-7 days, depending on the reason for the splint).
NextA thumb spica splint (see the image below) can be used for various injuries, including the following:
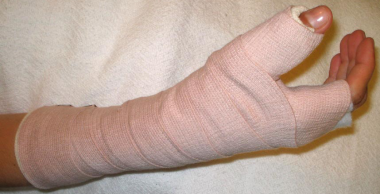 Thumb spica splint. Image courtesy of Kenneth R Chuang, MD.
In a clinical trial, Becker et al compared prefabricted neoprene hand-based thumb spica splints with custom-made thermoplast splints for treating trapeziometacarpal arthrosis. The trial concluded that the thumb spica splint was more comfortable, less expensive, and equally effective in treating the condition.[2]
Rocchi et al carried out a randomized prospective clinical trial that included 30 men who underwent surgical treatment of an acute complete UCL tear; after surgery, 15 of the patients received a standard spica splint, and the other 15 received a modified spica splint that allowed immediate postoperative motion.[3] The modified splint was associated with earlier functional recovery and better postoperative function.
There are no absolute contraindications for thumb spica splinting. Relative contraindications involve injuries that require immediate evaluation or intervention by a consultant (eg, an orthopedic surgeon, hand surgeon, or plastic surgeon), such as the following:
Splinting is usually tolerated without the use of anesthesia. However, if significant manipulation or reduction of the injury is required during the splinting process, anesthetic techniques may be used. Acceptable techniques include the following:
With the administration of any analgesic agent or the initiation of a formal sedation protocol, care should be taken to avoid oversedation. A complete neurovascular examination should be performed after the splint has been applied.
Equipment employed in thumb spica splinting includes the following (see the image below):
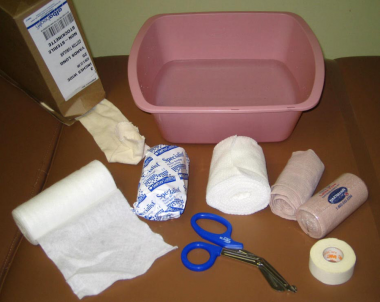 Equipment for thumb spica splint. Image courtesy of Kenneth R Chuang, MD.
Place the patient in a comfortable position (eg, seated or reclined). Cover the patient with a sheet to avoid splatter from the wet plaster. (See the video below.)
Thumb spica splinting: appropriate coverage of patient. Video courtesy of Kenneth R Chuang, MD.Completely expose the injured limb. Jewelry should also be removed. In particular, rings can cause constriction and ischemia of the fingers with delayed swelling of the soft tissues. If a ring cannot be removed, try using soap as a lubricant, or consider a ring cutter. (See the video below.)
Thumb spica splinting: removal of jewelry and rings to avoid ischemia from swelling. Video courtesy of Kenneth R Chuang, MD.Explain the procedure to the patient, including risks and benefits. Obtain informed consent.
With the patient appropriately positioned (see Positioning), apply the stockinette. Cut longitudinally at the distal end of the stockinette to allow coverage of the thumb. When measuring the stockinette, allow for extra length. The stockinette should extend 2-3 cm beyond the overlying padding on either end. In turn, the padding will extend 2-3 cm beyond the overlying wet plaster on either end. Together, the stockinette and padding will be pulled over the edges of the wet plaster to create smooth edges. (See the video below.)
Thumb spica splinting: application of stockinette. Video courtesy of Kenneth R Chuang, MD.Wrap the padding over the stockinette (see the video below). Overlap each layer by half the width. Also allow for extra length. The padding should extend 2-3 cm beyond the overlying plaster on both ends. Smooth out creases, unwrapping and rewrapping as necessary. Apply extra padding to the bony prominences of the wrist and to the metacarpophalangeal (MCP) and interphalangeal (IP) joints of the thumb. (See the video below.)
Thumb spica splinting: application of cotton padding. Video courtesy of Kenneth R Chuang, MD.Measure the dry plaster (see the video below). For an average-sized adult, plaster for the thumb spica splint should be eight to 10 layers thick. Use plaster that is 3-4 in. wide. After counting out the layers, measure the plaster from the level of the IP joint of the thumb to the proximal third of the forearm. Then, at the level of the MCP joint, cut a triangle 1.5 cm deep along both edges. Cutting the triangles avoids amassing of plaster when the thumb is abducted in the molding step. (See the video below.)
Thumb spica splinting: measurement of dry plaster. Video courtesy of Kenneth R Chuang, MD.Allow for roughly 5 mm of extra length on either end; plaster shrinks when wet. Excess wet plaster, on the ends, will be folded over.
Next, submerge the plaster in clean, room-temperature water. Allow all the bubbles to escape. This starts the lamination process of the plaster and allows the layers to bond together. Squeeze out the excess water. With the fingers, strip out the remaining water. Then, lay the plaster on a flat surface or dry towel, and smooth out wrinkles and folds. This allows further bonding of the plaster layers. (See the video below.)
Thumb spica splinting: wetting of plaster. Video courtesy of Kenneth R Chuang, MD.Apply the wet plaster, over the padding, to the lateral or radial surface of the forearm, extending along the length of the thumb to the IP joint. Fold outward excess plaster on the ends. The underlying stockinette and padding should then be folded outward on both ends in such a way as to create smooth edges. (See the video below.)
Thumb spica splinting: application of wet plaster. Video courtesy of Kenneth R Chuang, MD.Apply the bandage wrap over the wet plaster. Start distally, at the IP joint of the thumb, and wrap proximally. Avoid wrapping too tightly. (See the video below.)
Thumb spica splinting: application of bandage wrap. Video courtesy of Kenneth R Chuang, MD.While the plaster is still wet, mold the splint into the desired shape. The wrist and hand should be in a neutral position. Extend the wrist to 20°, and abduct the thumb. To assist in achieving neutral position, ask the patient to imagine holding a wine glass, or hand the patient a bandage wrap to hold. (See the video below.)
Thumb spica splinting: molding of splint. Video courtesy of Kenneth R Chuang, MD.The patient's hand, wrist, and forearm should remain immobile until the splint is dry. Advise the patient that he or she may feel some warmth released from the plaster as it dries. However, if the heat becomes too intense, unwrap the splint and remove the plaster immediately; thermal burns can occur.
Once the splint is dry, check for neurovascular function and capillary refill (see the video below). Keep in mind the areas innervated by the main sensory nerves in this area:
Remember to check motor function, as well. Wipe away any plaster that may have dropped onto the patient's skin.
Finally, deliver appropriate aftercare instructions. Instruct the patient to rest, elevate, and ice the injured limb. Instruct the patient to remove the splint and return immediately or go to an emergency department if he or she experiences weakness or numbness, color change (pale or bluish), increasing pressure or pain, or spreading redness or streaking.
Keep the splint clean and dry. Do not stick any items into the splint. Patients can be tempted to use sticks, pens, or hangers to scratch an itch. Advise the patient that sticking objects into the splint can wrinkle the padding and lead to pressure sores or cause a break in the skin and lead to an unattended infection.
Arrange for follow-up with a consultant, usually in 2-7 days, depending on the reason for the splint.
If the patient received any sedation or opioids, advise against driving or alcohol consumption.
To assist in achieving neutral position of the hand and wrist, some clinicians advocate having the patient hold a can or a bandage wrap. Alternatively, the patient can imagine holding a wine glass. With either method, maintain the wrist at 20° extension. If the wrist is immobilized straight or in flexion, a flexion contracture can develop because the wrist extensors may be unable to overcome potentially shortened wrist flexors.
For injuries or reductions that require shorter drying times, faster-setting plaster is available (eg, Specialist Extra Fast Setting Plaster). However, as plaster dries faster, the risk of thermal injury increases. For most splints, regular plaster (eg, Specialist Fast Setting Plaster) is appropriate.
Consider prescribing an antihistamine (eg, diphenhydramine) for itching. However, if the itching persists or worsens, the splint should be evaluated for complications.
On physical examination, injury to the scaphoid can be tested by compression dorsally at the anatomic snuffbox, compression of the wrist volarly directly over the scaphoid, and axial loading of the thumb. Pain upon these compressions is suggestive of scaphoid injury. Flexion of the MCP joint does not transmit pressure or forces to the scaphoid.
An injury or fracture to the scaphoid is difficult to detect by means of radiography. When a radiograph is obtained to rule out fracture but is read as negative, an occult fracture cannot be ruled out. The patient should be advised of this possibility. Such fractures might only be identified on delayed radiographs. A patient who has clinical evidence of a scaphoid injury on physical examination should be placed in a thumb spica splint and should receive close follow-up.
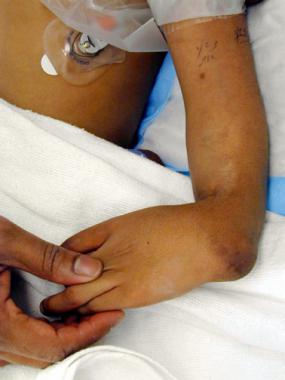
The term gamekeeper's thumb originates from a description of injuries sustained by Scottish rabbit gamekeepers.[4] Repetitive and sudden valgus forces placed on the gamekeeper’s thumbs, when they killed rabbits by breaking their necks, resulted in injuries to the ulnar collateral ligament (UCL). On physical examination, a UCL injury presents as pain, weakness, and instability during challenge of a pinched grasp between the thumb and fifth digit (see the image below).
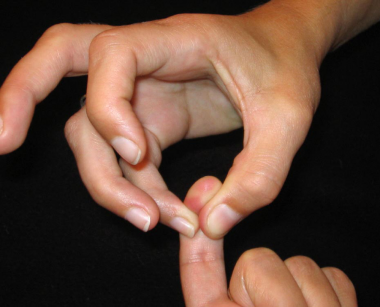 Test for ulnar collateral ligament injury (gamekeeper's thumb).
Patients can typically expect to feel some warmth as the plaster dries. However, if intense heat or any pain is reported, the plaster should be removed immediately to prevent possible thermal burns.[5] As more layers of plaster are used, more heat is produced. Use clean, room-temperature water. Water that is dirty or too warm accelerates the drying time and increases the heat produced. Do not wrap towels or blankets around the splint to shorten drying time; this produces excess heat.
To prevent pressure sores, provide extra padding to bony prominences. When wrapping the cotton padding, avoid creases. When creases occur, smooth them out, or unwrap and rewrap as needed. When molding the wet plaster, use broad-based pressure. In other words, do not use the fingertips; rather, use the entire palmar surface of the hands and fingers to mold the plaster.
Contact dermatitis may develop with thumb spica splinting.
Increased pressure from swelling may give rise to ischemia and neurovascular compromise. If moderate-to-significant swelling is anticipated, cut the cotton padding lengthwise along the medial or ulnar side of the forearm before applying the wet plaster on the radial side. This allows for expansion of the padding. If using tape to secure the outermost bandage wrap, do not tape circumferentially.
Immobilization may result in decreased range of motion. Advise the patient that, depending on the extent and nature of the initial injury, he or she can often expect long-term pain, arthritis, stiffness, and decreased range of motion, despite best care practices. The aftercare of such injuries often requires physical therapy.
Copyright © www.orthopaedics.win Bone Health All Rights Reserved